
FOREGROUND/BACKGROUND
THE BIG AND SMALL OF
PERSPECTIVE MODEL PHOTOGRAPHY
AKA “YES, VIRGINIA, SIZE REALLY DOES MATTER!”
T
|
his entry in my blog is an attempt to explain what I’ve learnt about an aspect of model photography that is absolutely crucial in achieving that sought-after realism that modellers strive for after completing their miniature masterpieces. I’ll be the first to admit that I’m no expert on the matter and that there are people out there who have had infinitely more success than my meagre efforts, however I have gained a bit of knowledge on the subject and would like to pass on any relevant titbits to those of you who may be interested in improving your photographic efforts.
Forced Perspective viewing, essentially the art of using larger scale props, models, etc. in the foreground and smaller scale items in the background to enhance the apparent distance between the two was probably first employed in stage shows and plays hundreds of years ago. A small stage in front of the audience, however the illusion of much greater distances could be achieved using perspective in front of a painted backdrop. Viewed from a specific position (ie. the audience) the illusion of great depth and distance could be inferred with a minimum of effort and stage area. The same was still very much true with the introduction of still cameras, followed by movie film and finally the advanced video cameras of today – viewed from essentially one angle, straight on, the audience is controlled and limited into seeing only what the photographer wants them to see, that of a realistic horizon and great depth of view, just like in real life. Of course, in a stage setting with live actors performing a play, a “willing suspension of disbelief” is employed by the audience so their enjoyment of the performance is not hampered by the instinctive knowledge that what can be seen is not necessarily the whole truth.


 |
| All images Copyright Australian War Memorial. |
For model makers, working in a variety of scales comes as second nature; 1:144, 1:72, 1:32 and 1:24 for aircraft, 1:72, 1:35 and 1:16 for tanks and AFVs, 1:24 for cars and trucks, etc.... Combining these varying scales into one still photograph can be extremely rewarding when viewing the finished result. I’m reminded of a visit to the Australian War Memorial in Canberra many years ago where I saw, firsthand, the amazing realism and simulated “depth of viewing” that some of the battle dioramas managed to accomplish. I vividly remember seeing larger (1:20 or even 1:12 scale?) soldiers in the foreground, with diminishing scales of other figures and vehicles filling in the background areas, along with a painted cyclorama at the rear, creating scenes that possessed such an incredible realism that one had to look twice to ensure that an actual war scene hadn’t been photographed. In effect, these dioramas are “shadow boxes”, model scenes that can only be viewed from a particular angle, with careful lighting used to help sustain the illusion of depth and distance. Use your search engine to locate the boxed dioramas of Shep Paine, one of the masters of this forced perspective technique in model making. His work is absolutely stunning to say the least. In the past I have had plans to create some shadow box dioramas, however they failed to see the light of day.
One of the best movie examples of the use of forced perspective to create the illusion of size disparity is Disney’s “Darby O’Gill and the Little People”. Released in 1959, the film is chock full of Special Effects, with special mention being made of the forced perspective shots that occur when Darby (Albert Sharpe) visits the leprechauns in their underground kingdom. To call these shots intriguing, even amazing, is an understatement. They are intricate and undetectable, combining live actors in two separate planes to create the illusion that Darby is walking amongst tiny people. No CGI, no blue screen used at all, a few foreground puppets and just the placement of a normal sized actor in the foreground, with other actors in the far background to show the apparent size difference between the two. The shots are still mind boggling today.
 |
From "2001: A Space Odyssey"(1968), these are
a combination of photographic cutouts and
miniature landscapes, built in forced perspective
style (ie. larger in the foreground and much smaller
in the background) and positioned in front of the
camera so as to appear far more distant and
vast than they actually are. The live action
segments, the Earth and stars are all separate
exposures and matted in afterwards. The total
depth of the miniature sets was apparently only
about six feet (2 metres).
|


A further use of perspective photography occurs in Stanley Kubrick’s “2001: A Space Odyssey” during the Moon Bus sequence on the lunar surface. Apparently, to create the effect that the landscapes were of a much larger size than they really were, photographic cutouts of the rolling plains and mountain ranges were lined up, one in front of the next in front of the cameras and carefully modelled and dressed to appear to cover thousands of square kilometres of the lunar surface. To the camera the illusion was complete, however when viewed from above the miniature landscapes appeared too narrow and squeezed.
A recent example of perspective in film occurs in “Lord of the Rings: The Fellowship of the Ring” in Hobbitown when Gandalph is sitting at the table with Frodo.


 |
| Action on the set of "Lord of the Rings", perspective photography being effectively used. |
Two different sized tables were employed, along with food, decorations and cutlery, to show the diminutive stature of the Hobbits compared to normal human beings. Along with tracking shots by the camera and very careful lineups, the effect is simple and startling. Forced perspective setups are used extensively throughout the “Lord of the Rings” trilogy.
These examples are just three mentions of a technique that is employed in many motion pictures, even in this day and age of computer generated backgrounds, action scenes and complex special effects.
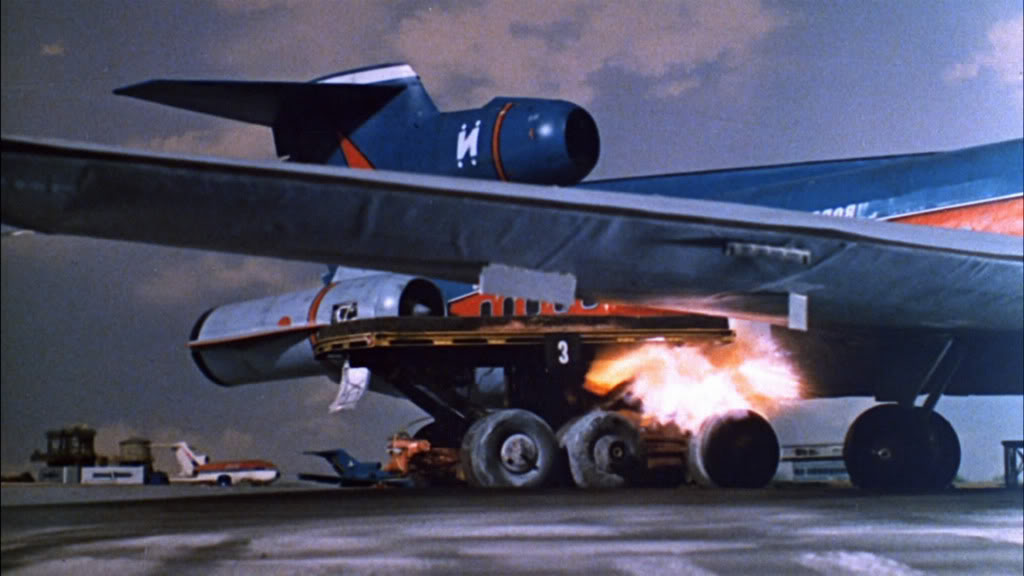
For Derek Meddings and his talented team of model builders and technicians working on the puppet shows of Gerry and Sylvia Anderson in the 1960’s, forced perspective photography was an absolute necessity. Filming on model stages no bigger than a few metres in length and width required the use of many varying scales of miniatures to enhance the illusion that a far larger area was being photographed in 35mm film. With a huge sky cyclorama in place along the back wall of the stage, moveable tables were set up in the foreground and the landscape sets were built according to what could be seen through the lens of the camera. What the landscape looked like to the naked eye was relatively unimportant – the essential viewing was done through the lens to achieve a sense of depth to the scene. Various model buildings and vehicles would be placed on the landscape according to their scales and to what they looked like through the camera. In early shows such as “Fireball XL5”, “Stingray” and “Thunderbirds”, car and vehicle scale was generally about 1/24 in order to use existing model kits. In later shows like “Captain Scarlet” and “Joe 90”, vehicles of up to 1/12 scale were used for greater realism and more added detail.


 |
| All of these shots from various Gerry Anderson shows have one thing in common. They all utilise forced perspective to achieve their look of realism - larger scaled vehicles in the foreground and smaller scaled examples in the background. |


Buildings were constructed, mainly from plywood and other timber, in these scales to accommodate the vehicles, while other structures were produced at a much smaller scale to fill in background areas. In the near foreground, closest to the camera lens, might be placed a couple of larger scale tree branches or some additional structures. Built in horizontal levels, the miniature set may consist of anywhere up to five or six differing scales of models – from the extreme rear - the sky cyclorama, painted horizon, sloping background or mountain range, midground level areas, foreground sections and closeup foreground pieces – total depth, about five to six metres. The apparent depth would essentially be infinity, ie. as far as the eye (camera lens) could see.
To illustrate this use of forced perspective in a model situation that can be achieved in a garage or large garden shed, I offer the following photographs of a setup I constructed for my latest video venture called “Dogfight!” To emulate the setups of Derek Meddings and his team, I had to construct the following necessary items – a large sky cyclorama, six metres long and three metres high; a distant horizon cutout made from plywood sheet; sloping hills for the background, two table tennis tables converted to shooting platforms with the addition of rolling castors; and a sloping foreground of 2mm styrene sheet. All this was done over a period of a year and a half, along with the construction of vehicles, aircraft and buildings in varying scales – 1/72, 1/35 and 1/144 being the most common used. As well as all those, larger scale wing and weapons pod sections were constructed for two of the aircraft featured, at around 1/16 scale.
 |
| The basic framework consists of 25mm PVC piping. |
 |
| It took a lot of blue paint to cover the 18 square metres. |
 |
| The wooden framework for the sloping hills. |
 |
| Setting up the horizon and sloping hills on the rear table. |
 |
| One of the model stages before a coat of grey primer. |
 |
| Setting up the two tables prior to dirtying down with dust and cement powder. |
 |
| Setting up the opening scene from "Dogfight!" |
 |
The scene as it appears in the film, along with a moving vehicle. |


*** For additional information on the Disney film, “Darby O’Gill and the Little People”, check out Peter Cook’s website called Matte Shot – a wonderful collection of informative and startling blogs on all manner of Special Effects – a damned good read in every area! “Darby” can be found at: http://nzpetesmatteshot.blogspot.com.au/2010/06/darby-ogill-and-little-people-disneys.html
*** “Lord of the Rings” photos are from: http://www.cracked.com/article_19140_8-movie-special-effects-you-wont-believe-arent-cgi.html
*** “2001: A Space Odyssey” photos are from:
*** Most of the Derek Meddings FX photos can be found at: http://www.eagletransporter.com
Nice and informative post, love the photos and really enjoyed reading it,
ReplyDeleteThanks Richard. Glad you enjoyed the article. I'll have to write Part 2 soon. Check out a film from the 1990s(?) called "Attack of the 50 Foot Woman", with Daryl Hannah and Alec(?) Baldwin - absolutely stunning forced perspective setups. I think "Cinefex" magazine did an article on the FX for the film. Worth checking out. Thanks again.
DeleteCheers