Friday, 9 January 2015

WORLD AIRFORCE

THE NEXT GENERATION

While recuperating from a recent major operation and, at the same time, receiving 30 doses of radiation away from my home town, I had the opportunity to take some model kits with me and to spend quite a few hours doing what I love doing - butchering kits and creating something totally new and unique. Not having done any modelling for a while, due to health reasons, it seemed a good pastime to take my mind off what was happening around me and to get some practice in while I had the hours to spare.
Having acquired many aircraft kits over the past few years, it seemed the safe option to take as many of them away with me as I could transport in the car. It took quite a while to choose which models would best lend themselves to my kind of "butchery" and, along with repacking the smaller ones into larger boxes to save space, I ended up with about eight kits that would be good starting points to create Gerry Anderson-like models that could have appeared in "Thunderbirds", "Captain Scarlet" or "Joe 90". These kits were as follows:

Hobbycraft 1:48 scale CF-105 Arrow Fighter
Hasagawa 1:48 scale J35 F/J Draken
Monogram 1:48 scale F104C Starfighter
Academy 1:144 scale B-58A Hustler
Airfix 1:72 scale SAAB Draken
3 kits of the Academy 1:48 scale Mirage III R Fighter


 As well as these particular kits, some of which would be familiar to devotees of Gerry Anderson shows, I also threw in some bits from my spares box, along with all the tools that I'd need for the six weeks away. Amazingly enough, all this fitted into a single large box for transportation purposes.
The idea was to make as many different models as possible by using just the pieces in these kits. Lacking the space for an airbrush and other major tools, I was limited as to what I could get done on each model, however automobile spray cans for painting were purchased as needed, along with lengths of brass tubing for wing support and undercarriage additions to be made at a later stage.
The same techniques were used on each model - sorting through the kits to see what parts suited each other; trimming or in some cases, totally removing large sections of the parts; gluing everything together securely; sanding and puttying with car "bog" to achieve a smooth finish, priming the model with automobile grey primer; spraying the basic colour(s) from auto cans; masking off areas for respraying; touching up small parts and sections with a brush; adding pencil lines, generic decals and car pinstriping tape; providing lead pencil weathering to dirty each model down; adding clear coats to protect the finishes. In all cases, the models needed to be transported back home in order to complete them, such as the addition of landing gear, decals and weathering etc. Where I was modelling only allowed me to get to the basic colour stages with the models.

 AIRCRAFT #1

BOMBER
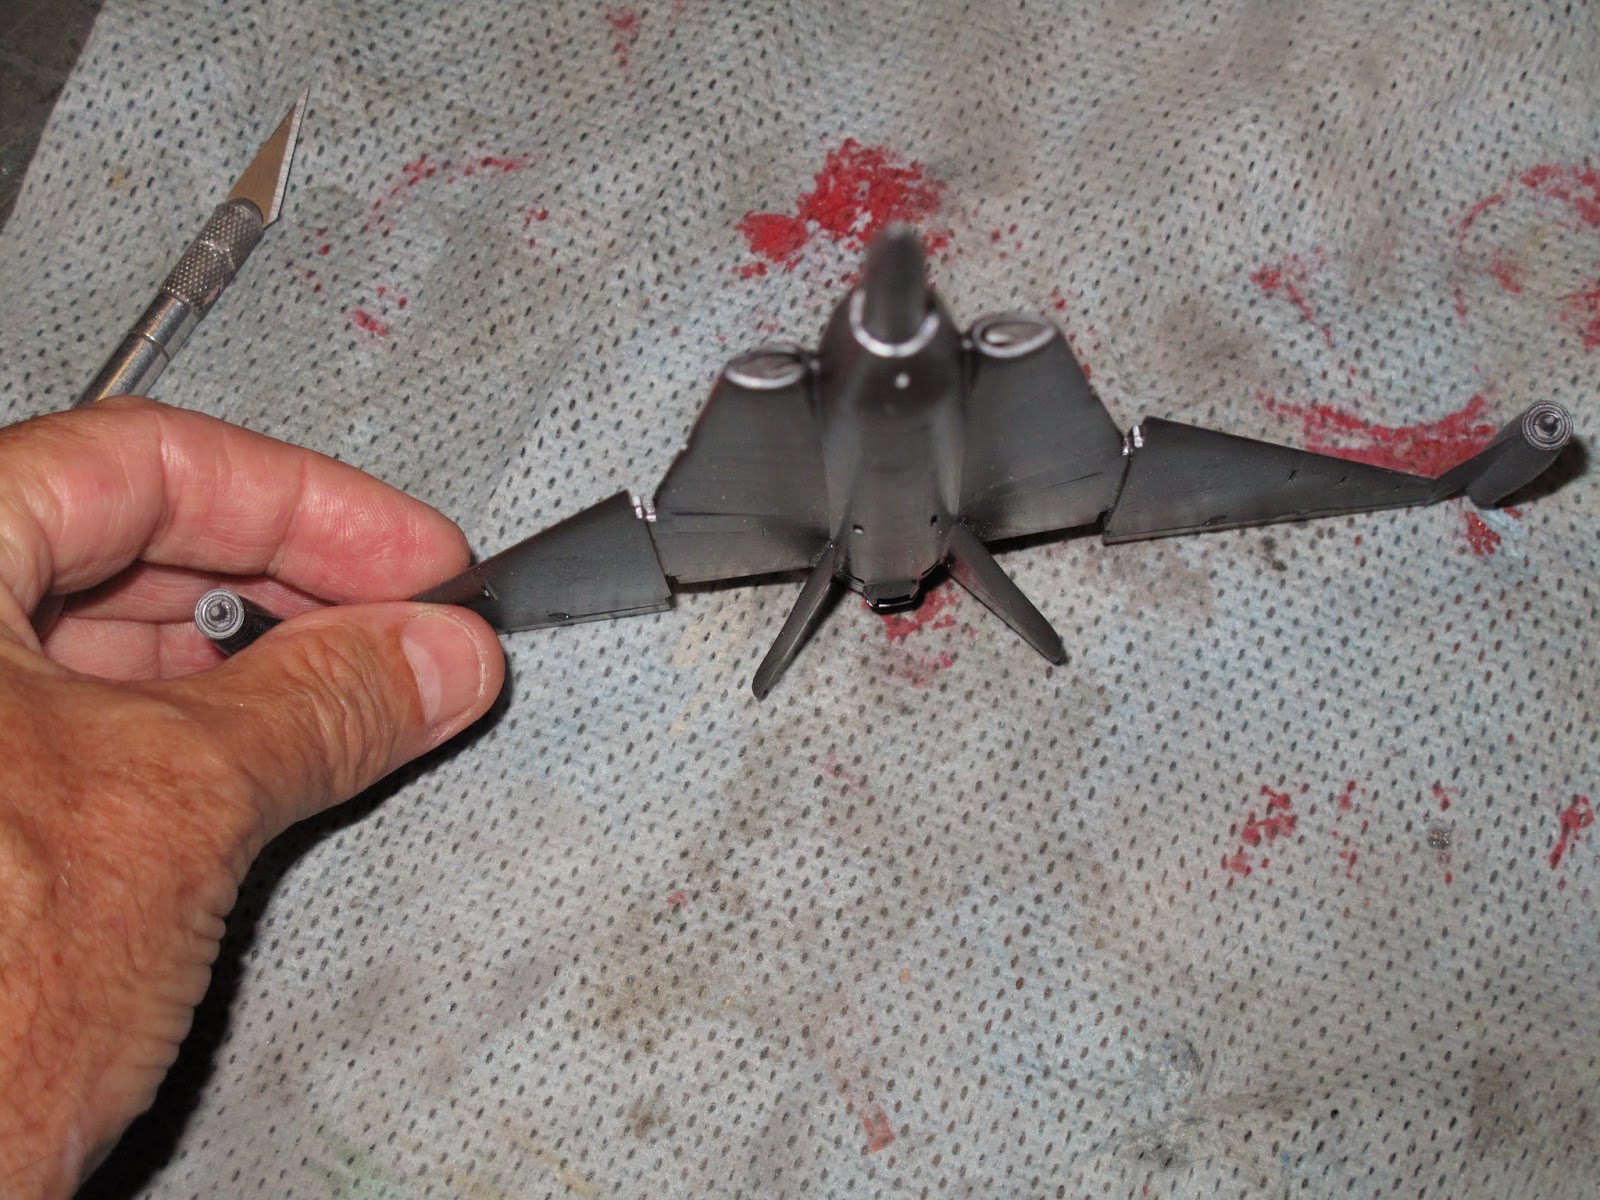
The first one I worked on. I removed the nose of the Arrow Fighter and replaced it with other parts to make it more interesting. The Arrow's fuselage was used, minus the wings, while a pair of Mirage Fighters became the engines midway along each wing. The Mirage fuselages were reversed and new outer wings were added by using the 1:144 scale Hustler wings. All sections were pinned for strength using brass tubing and copious amounts of Araldite, two-part epoxy glue. I added four vertical wings from the Mirages to the top and bottom of the main wing area, again fixing them very securely with tubing and Araldite. For the front undercarriage area, I inserted a section of brass tubing permanently into the models where the undercarriage could be "plugged" into the aircraft when it had been made later on from brass, kit parts and toy car wheels. The rear undercarriage would need to be completed back at home as I didn't have the necessary parts to construct the housings for these sections.


AIRCRAFT #2

FIGHTER
Basically I worked on two or even three models at any one time. This one was very pleasing to design using the front section of the Starfighter and the main fuselage from the Draken in 1:48 scale. With a little "encouragement" one just plugged neatly into the other. The large wings at the rear came from the Arrow Fighter, while the Draken provided its own vertical stabiliser. To position the two sets of brass tubes into the undercarriage areas, I had to add two drop tank halves to the upper fuselage in order for the brass tubing to have something to be glued into. I'm rather pleased with the shape of this aircraft - just different enough to be interesting, but not too outrageous to be too fanciful. This was the first model given a colour spray - Toyota Silver for the overall colour and Venus Orange for the added colour after everything was completely masked off, the inspiration coming from, believe it or not, the Treehawk in Gerry Anderson's "Terrahawks".


AIRCRAFT #3

INTERCEPTOR
I had some small bits and pieces left over after all this creativity so I decided to put some of them to good use by combining the 1:72 scale Draken fuselage with a pair of extra wings, the wingtips from the 1:144 scale Hustler and a pair of engine intakes from same. A new nose was kindly provided via a droptank. I can't say that I'm overly happy with the resulting design, however it was a quick build. Being such a small scale, I didn't worry about providing it with any landing gear. The basic colour is called Dark Grey.


Aircraft #4
Helijet

All throughout "Thunderbirds" is featured a helijet that was created from a pair of Kaman Husky kits joined rear to rear. I've always wanted to do my own version of this technique.


While visiting my local hobby shop I chanced
upon a pair of Airfix helicopters, the 1:72 scale Westland Sea King, at what I thought was a reasonable price at the time. After sorting through the parts closely before creating my helijet version, I was absolutely appalled at the quality of the injection cast pieces, the very worst I've seen in many years. Whether this was because of the age of the kit or not, I'm unsure, however if I was the quality control person at Airfix, I'd throw the towel in right now. I'd have to be a world-class modeller to assemble anything remotely decent from this terrible kit. You have been warned!


I began by removing the tail section from both kits and dryfitting them together to get some ideas for an overall shape of the fuselage.


After a couple of hours of rummaging around in the spares box I had produced the four undercarriage sections from a conglomeration of various kit parts.


 Wanting rotating vertical thrusters to be positioned mid-fuselage necessitated the use of a length of brass tube with a pair of kit parts glued to both ends. The thrusters themselves were cobbled together using a number of cut down drop tanks from the trio of Mirage fighters. Detail was provided from landing gear and other bits from the kits mentioned previously.


 A collection of kit pieces from the above kits became the detail on the helijet, as well as the rear wings and forward thrusters attached to each of them. Kit parts were also used to cover up a few join lines and fitting problems that resulted from the poor quality of the original helicopter kit. A small amount of putty  completed the helijet, after which it was thoroughly primed.

 MORE LATER ON...


Friday, 29 August 2014


 THUNDERBIRD 1
FIRST TO THE DANGER ZONE!

 Ah, "Thunderbirds" - the television series just refuses to die. First broadcast here in Australia way back around 1965, it was Gerry Anderson's signature show, a thrilling combination of Supermarionation puppetry and realistic miniature sets and models. Oh, and lots of explosions as well. What more could a ten year old boy ask for? Other shows such as, "Captain Scarlet", "Joe 90" and "UFO" developed even more audacious and bigger special effects and vehicle designs, thanks to Derek Meddings and his talented team and the puppets became more proportional and lifelike, however Gerry will always be remembered for introducing us to the exciting and dangerous world of International Rescue.
Before the advent of "Star Wars" and the merchandising phenomenon which swept the globe like a tidal wave, Gerry Anderson had already been there and done that with his hit TV series. As far as model kits of the various craft were concerned, a plethora were produced during the 60s and are still be designed, distributed even today, 50 years after "Thunderbirds" was first screened. Take a look at any SF modelling website and somewhere, someone will be creating models from the show. Not too bad for a children's show that's half a century old! Even as you read this article, a re-imagining of the classic show is being produced at Weta Studios in New Zealand. Will it become a bona fide hit, as its parent was? Will the craft designs be faithful to the originals? One thing is for certain - lots of people will watch it when it hits the screens in 2015, myself included.

Quite a few years ago, a good friend and fellow modeller, Michael Daczynski, created a resin kit of Thunderbird 1, which I promptly purchased from him. It sat in a box in my shed for about five years, the parts all cleaned up and ready to assemble. Well, the time finally arrived when I needed a break from building models for my short films and I hauled it out for another look. Apart from having to cut out the recessed wing area on either side of the main fuselage, the removal of a few "gnarly bits" in between the vanes on the lower engine section, as well as filling some pinholes in the resin, the model was just begging to be assembled. 

Michael had done a stirling job in creating the original sections in plastic and timber and then casting them in Fast Cast resin. I know how particular he can be when it comes to references and getting the model accurate, so I had absolutely no qualms about the model looking exactly like what it was supposed to represent. Of course, in the original show, many different models of Thunderbird 1 were produced in order to fulfil particular requirements and to replace damaged models during the months of rigorous filming. All of these models differed from each other, less so with Thunderbird 1 than with some of the other Thunderbird craft. TB1 markings differed from model to model, landing gear was changed. shapes of nosecones too, not to mention the many colour differences displayed. (None of this had concerned a ten year old boy enthralled with the show in 1965 however.) Nevertheless, minor variations occurred on a regular basis. Michael had closely studied all the versions of TB1 and decided to pick the one he liked the best and to replicate that one.
The kit came in a total of fifteen sections - three hollow cast pieces (the lower engine area and the two pieces for the main fuselage), four angled fins, two wings, four "corner pieces" for the engine area and a nosecone with a separate ribbed piece to fit to it. If Michael had cast the model as solid sections, then it would have weighed a couple of kilograms. The completed model would be 487 millimetres (19 inches) in length - quite a decent size and, as far as I can work out, at about 1:72, to studio scale with the largest complete version of Thunderbird 1 used in the show.
 
 After removing those annoying "gnarly bits" with a sharp scalpel and filling the remaining resin pinholes, I glued the upper ribbed piece to the nosecone. Two epoxy Araldite was used throughout the build. To add strength to the nosecone, I drilled a small hole and inserted a 3mm section of brass tube. Eight millimetre brass tube was also inserted through the largest of the main jets on the very bottom of the engine section and this protruded enough to add the main fuselage cylinder for strength and alignment. The idea for displaying the model was to have it in launching position above a thick wooden base that just happened to be lying around from a previous model. The base had been painted grey, lines drawn on and weathering applied, so it seemed silly not to use it just as it was. I drilled three holes into the base to accept a trio of brass tubes, the middle one being longer so it would telescope into the tube secreted within the main body. The intakes on the upper cross-shaped engine section were detailed with eight circles of fine wire mesh.
 
The wings could be positioned in either flight or landing mode and I opted for the former. Because of a lack of fixing points within the hollow cast shell, having the wings swung out just seemed a little difficult to achieve. A Dremel made short work of the areas where the wings would slot into the fuselage and a drill was used to make the rectangular holes in the ends of the cross-shaped engine section where the angled fins would be glued.
 As far as colours go, there was a lot of guesswork involved. I emailed Michael and another friend for information and on their advice I chose the best reference photographs I had and took a trip to my local car accessory shop for some acrylic spray cans. For the main body and wings I selected Champagne Glow Metallic (co-incidentally the very same colour as a previous car of mine), while Centre Red was picked for the nosecone. I already had a Sky Blue for the lower body, stripes and wingtips. Although the colours were fairly light in tint, I reasoned that, with subtle weathering applied to the finished model, they would appear more like the ones in my reference photos. After priming all the pieces in acrylic, I gave a final once over with fine steel wool and applied the various colours to the sections, three light coats in all. So far, so good. When completely dry, Tamiya tape was used to mask the wingtips and tips of the angled fins at the rear. These were then sprayed with the Sky Blue. Black pinstriping tape created the lines on the fuselage near the nosecone.
The various sections needed to be permanently glued together at this point. I had delayed this part up until now in order to mask and spray the colour differences with relative ease. How to affix the wings inside the one piece main fuselage caused me a few concerns as there weren't any interior sections to actually glue them onto. Michael sent me some drawings he had made in order to position the wings, however I was unable to make heads nor tails of them. At this point in time, the wings are temporarily fixed inside the fuselage until I can find a more permanent solution. And yes, they are not positioned correctly, I know.
 
 
  Many of the original Thunderbird 1 models differed markedly in the lettering applied to the fuselage, probably moreso than with any body shape differences. Some had TB1 vertically, while others had the same letters horizontally. Some models had lines in certain areas, others left them off. Michael had provided an A4 sheet with the various lettering for the model he had created, so I scanned this at 100% and printed it onto a white sticky label sheet and cut all the individual letters out carefully. After application, a couple of coats of flat clear sealed them permanently, after which the weathering was added using a lead pencil and business cards to achieve the straight-edged panelling effect I was after. An airbrush and dark grey mixture provided additional panelling over the entire model, after which numerous coats of flat clear were sprayed.


The model was lowered onto its display base and the brass tube inserted into the interior support tube. For the billowing smoke from three of the engines, I used pillow stuffing, carefully tying sections to the three support rods with white cotton to conceal them and adding teased out stuffing in a realistic pattern. All in all, an enjoyable and very pleasing build, thanks to Michael's dedication and modelling skills. It certainly looks impressive on its base. Now all I have to do is to talk Michael into creating that hollow kit of Thunderbird 2, studio scale, to go with the Thunderbird 1!


Thursday, 12 June 2014

"ANNIVERSARY"

The Making of Another Short Film
 

Well, it was time to bite the bullet and take the first tentative steps in creating the next motion picture epic from GM Productions, entitled, "ANNIVERSARY", the story of a little girl who travels to Mars to visit her grandfather. As an homage to Derek Meddings, Gerry Anderson and Stanley Kubrick, I'm hoping to make something extra special that others can enjoy. The storyboards are done, albeit with some major revisions, a couple of the necessary filming models have been created, although certainly not all of them by any stretch of the imagination and I had been delaying the initial 'first day filming' for as long as possible, due to a hesitation in committing myself to some seriously difficult problem solving over the next few months. However, as Fate would have it, a filming window appeared in the shape of a few friends who were more than willing to help me out if I could take the first step and organise 'the day'.

This is the first in many entries on the filming of "Anniversary", over a many month period, so please excuse me if delays occur in posting them. I still have models to build, full-sized sets to construct (yes, there are live actors in this one!) and I'm working to pay for all of this, so it's going to take me a while before it's completed. I'm hoping that this effort will eclipse the work done in "Dogfight!" and be good enough to perhaps enter in a short film competition. More on that much later.

A special thanks goes to three friends who volunteered their time for the first day to achieve about ten usable shots for the opening of the film. They are Derek Romans from my local model club, Colin Woodfall who also helped out with "Dogfight!" and loved it and Chris Coxon, a very good friend from Brisbane who pushed me to make a start. Thanks guys. Without you all, this wouldn't have worked out at all.


Thursday 11 June 2014

Filming began on "Anniversary" at about 9:30 in the morning, with a couple of opening shots of the Aurora ETM Shuttle launching from its base and carrying a six year old girl on the first leg of her journey to Mars. The day before, Chris and I had spent nearly two hours attaching a pair of small pulleys onto the ceiling of the 'studio' so that 40lb fishing line could pass through them and be used to launch the shuttle. Another two fishing lines were attached to the ceiling and threaded through brass tubes on either side of the model in order to steady it as much as possible when lifted off the pad. A smoke machine had been positioned beneath the two tables to provide the majority of the rocket exhaust, while Colin had provided a very bright LED lamp for the engine glow of the rockets themselves. It was stuck to the bottom of the model with Blu-Tac, all very high-tech stuff here! A number of takes were committed to video and, after about six hours, I had about ten good shots that should be used in the film itself. With the exception of the initial pullback from the shuttle, all the other shots were filmed at 100 frames per second, four times normal speed, so as to smooth out the movements of the model as it was being raised into the air. With two fans blowing the smoke in manageable directions, banks of 500W tungsten lights and the flurry of human activity, it was quite a sight! Here are a couple of photos of what went on today...


Fans, lights, smoke machine, fishing line and two filming tables with sky background - all this just to achieve a couple of shots of the Aurora Shuttle liftoff.

Colin operating the smoke machine. A minimum of three people was needed to achieve just one simple shot.


It took over an hour just to set the fans in the correct position to push the smoke to where we wanted it to go. Sometimes we got a little too much!

The Director above the setup trying to achieve a downward view of the launch. Friend Chris is adjusting the lighting.

Wednesday 25 June
Another good friend from down south, Ashley Greenslade, turned up yesterday and was interested enough to help out with the second day's shooting. Colin Woodfall also assisted, once again, to get just two more shots after the initial launch sequence was completed last week. The three of us set the tables up with pillow stuffing for clouds, just below where the Aurora Shuttle was still hanging from the previous shoot. The idea was to achieve a shot looking down on the shuttle as it flies up from the cloudbank and past the camera. Colin operated the pulley system for raising the model, Ashley was on smoke machine duties and I perched atop a step ladder which was positioned on the table so that I was high enough above the shuttle as it flew past. After a dozen or so attempts, most of which were quite successful, I felt we had enough takes of this so we moved on to the second shot.
This involved separating the two filming tables, with enough space to pass the shuttle through, then covering both areas with "clouds" and getting a shot of the model rising up through the clouds and into the sky, tracking with the camera as it went. These two shots were filmed in reverse order, the second shot being shown first in the finished film, immediately followed by this second one. After another dozen or so tries, we achieved some excellent footage and retired for the day. It's a hard life!


Setting up for the second shot of the day. Plenty of light was needed to illuminate both the model and cloudscape on both tables, as well as the sky background.
The smoke machine was positioned on boxes directly below the model, with the nozzle pointed up so the smoke would follow the shuttle as it rose.
Ashley on smoke machine duties. The camera filmed from the far left of this shot, tracking the shuttle as it rose up through the "clouds".
Thursday 26 June
Just before Ashley left for the Deep North, I managed to capture a couple of shots of the Aurora Shuttle, filmed yesterday, as it will appear in the finished movie, shooting upwards through the clouds on its way to orbit.   


Ashley enjoyed operating the smoke machine for these simple still shots so much that he wants one for himself! Thanks mate, for all the help.
Tuesday 1 July
Both Colin and Derek joined me for the morning's shoot, however Fate had other, more frustrating plans in store for us. The idea was to get a couple of hand-held shots of the Aurora Shuttle against the rolling sky, the appearance of which would simulate footage of the real shuttle or Saturn V that I had seen on TV. I hoped that, with Derek on cordless drill duties, powering the rolling sky, Colin on smoke duties and myself on hand-held camera, that these shots would be "in the can" in a matter of half an hour. Not so! The rolling sky, constructed for the previous epic, "Dogfight!", had decided not to co-operate at all and it was constantly losing the cloth "sky" off the rollers, or, even worse, losing one of the rollers itself from the bearings they revolved on. What a pain! We did manage to get one or two reasonable shots that may be usable, but that decision will be made later on.
After effecting numerous repairs on the rolling sky, we positioned it on the table behind the suspended shuttle. the cordless drill at the lower right of the rolling frame powers the revolution of the "sky".
I had to film the shuttle upside down against the sky to allow the smoke at the bottom of the photo to be blown up and past the model.
I had drilled a small hole in the tail of the model to allow it to be suspended by fishing line in front of the rolling sky. With me in the foreground, Colin and Derek attempt yet another repair to the framework supporting the sky.